Test-Case Definition
Overview
A test case is structured into the following tabs:
| Tab | Details |
|---|---|
| General | Title, URL, user/role, folder, tags, and other meta-information about the test (see General below). |
| Steps | The actual test-case definition — the steps the AI agents will execute. |
| Variants | Optional parameter combinations that turn one test into many runs with different data. See Parameters and test-data. |
| Last-Runs | The most recent executions of the test case, with status and links into the execution details. |
| Change History | Audit trail of every change made to the test case (who changed what, when). |
| AI Assistant | Embedded AI assistant sessions for this test — useful for asking the assistant to extend, debug, or explain the test (only available on saved tests). |
The Change History, Last-Runs and AI Assistant tabs only appear once a test has been saved — they are hidden in create/copy mode. The Variants tab is hidden for snippets.
For step creation there are three possibilities:
- Manual via prompting: Write the test case in natural language in the Steps tab.
- Recording: Record the test case using the Record Test button in the header. For more details see the Recording section.
- Import: Write the test case in an external tool and import/synchronize it with msg.ZenTestAI. See External Systems.
- Create with AI / Import via AI: Generate the test from a conversation with the AI assistant, or from a pasted description / uploaded document. See Test-Case Overview.
General
The General tab collects all meta-information about the test — the what, where and who. Only Title, Start URL and User / Role are mandatory; everything else is optional but helps with organization and execution.
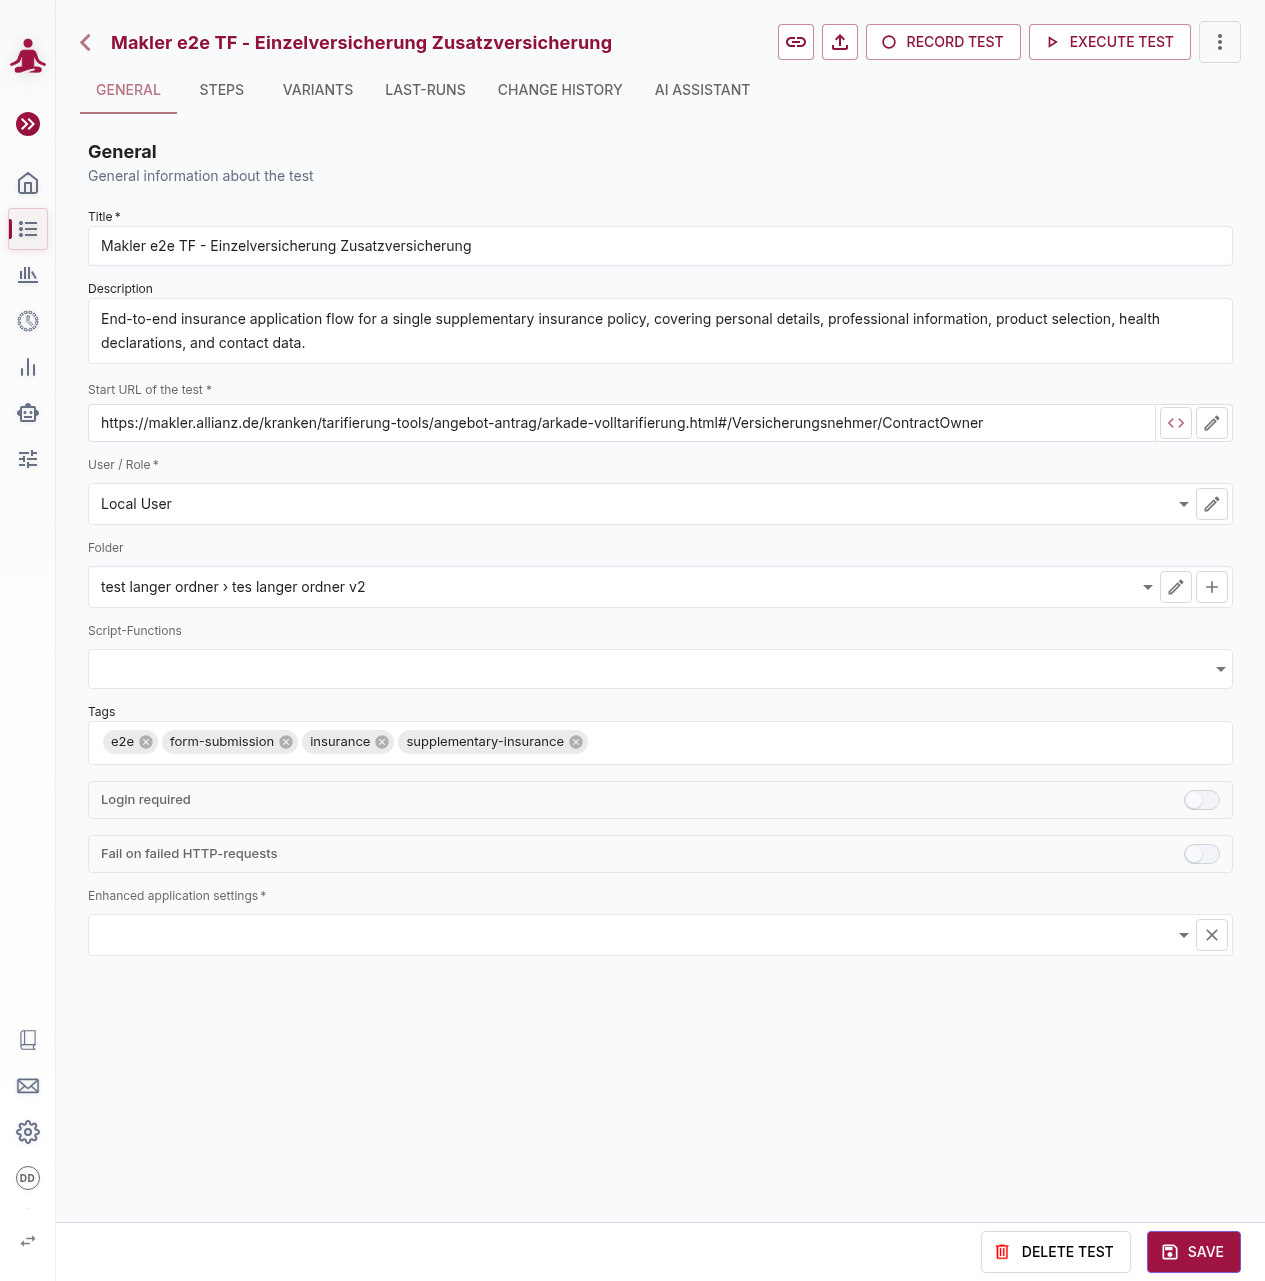
The fields, in display order:
-
Title — the test case name. Required. No effect on execution itself.
-
Description — free-text description. Optional, no effect on execution.
-
Start URL of the test — the URL the browser opens before the first step. Supports parameter placeholders such as
[[parameterName]](see Parameters and test-data) as well as macros for both query and path parameters. Two icons next to the field let you quickly add or edit the Application Settings for this URL.tipPer-URL behavior (timeouts, scrolling, custom wait times, before/after-login steps, …) is configured in Additional Functions → Application Settings and applies automatically based on the URL of the test.
-
User / Role — the actor that executes the test case. Required. The dropdown lists users/roles defined in the Users & Roles section. The pencil icon next to the field opens an inline editor so you can adjust or create a user/role without leaving the test.
-
Folder — the folder this test belongs to. Optional. Folders are hierarchical and shown as a breadcrumb (e.g.
Region › Insurance › Forms). Use the icons next to the field to edit the selected folder or create a new one inline. See Folders for the full description of the folder UX. -
Script-Functions — JavaScript functions you can reference from the test steps (e.g. for custom data generation or assertions). See Scripting.
-
Tags — free-form labels used to categorize tests. The picker auto-completes against the tags already used in the tenant, but you can type a new value to create one. Tags are used for filtering in the Test-Case Overview and the Execution Plans, and have no effect on execution itself.
-
Login required — toggle that injects an automatic login step at the start of the test. The toggle is set automatically when you pick a User / Role that has authentication configured, but you can override it manually. See Login Flow for the consequences.
-
Fail on failed HTTP-requests — when enabled, the test is marked as failed if any background HTTP request returns a server-error status (HTTP
5xx). Useful for monitoring: it catches technical errors that may not be visible to a user clicking through the UI. -
Enhanced application settings — picks an Application Settings host profile to apply to this run. The dropdown only contains values when host profiles are configured for the tenant.
-
Sync Test Data — only visible when the test is imported from and bound to Jira XRay and the Xray issue has test data attached. When enabled, the test data (parameter combinations) is synchronized from Xray on every save.
-
Jira Custom Fields — only shown when the tenant's Jira/Xray configuration defines custom fields for test cases (see External Systems → Jira custom fields). One input per configured field, labeled as defined by the administrator. The values you enter here stay local to msg.ZenTestAI and are pushed to the corresponding Jira fields on the Test Execution issue when execution results are sent to Xray.
Header buttons
The header of the test details page exposes the per-test actions:
- Manage external system link (chain icon) — link the test to a configured external system, or open the bound issue in the source tool. Only shown when at least one external system is configured for the tenant. See External Systems.
- Export (upload icon) — export the test as JSON or text.
- Record Test — start an interactive recording session that captures your clicks and inputs as test steps. See Recording.
- Execute Test — run the test now. If the test has variants, you will be asked which combination(s) to run.
- More actions (⋮) — a kebab menu with secondary actions, including Usage References for the test.
For tests bound to an external system, the header also shows the source-system ID (a clickable link for Jira/XRay), plus a Synchronize and Unlink action — see External Systems → Locking, unlinking and conflicts.
Footer buttons
The footer is fixed at the bottom of the page:
- Save — persist your changes. For tests bound to Xray, the button changes to Synchronize and Save when there are pending changes that need to be pushed to Xray.
- Delete Test — permanently delete the test, including all its executions. Deletion can not be undone.
The Save action is also bound to the Ctrl+s keyboard shortcut.
Read-only fields for imported tests
When the test is imported from and bound to an external system (Jira XRay or Zephyr), the Title, Description and Steps become read-only — the external system is the master for those. All other fields on the General tab remain editable. Use the Unlink action in the header to take the test out of sync and make every field editable again.
Snippets
When the test type is a snippet, the General tab is slightly different:
- Tags and Fail on failed HTTP-requests are hidden.
- Start URL and User / Role only appear when Login required is enabled (snippets normally inherit those from the calling test).
- An extra Isolated toggle appears when Login required is on. With Isolated enabled, the snippet runs in a transient browser session: cookies and local-storage are snapshotted before the snippet runs and restored afterwards. Use this when the snippet must log in as a different user than the parent test.
Steps
Inside the steps section you are able to define your actual test case. Please refer to chapter Prompting to understand how and which kind of steps you can write in your natural language. For each step you can define the prompt for the AI and optionally additional settings.
Using the burger menu right next to the step you can perform the following actions:
- Explain: Explain how the AI agents understands your step description.
- Copy: Duplicate the step.
- Advanced: Open the advanced settings in the sidebar for the step.
Prompting / Actions
Even though you can make full use of natural language features, msg.ZenTestAI understands some forms of test descriptions better than others. For the best results please refer to the Prompting section.
Advanced Settings
You can define advanced settings for a step inside the sidebar.
| Setting | Description |
|---|---|
| Comment | A comment for the step. This is only for documentation purposes and has no effect on the test execution. |
| Deactivate Step | Deactivate the step. The step will not be executed. In case you set this switch, you can also define a boolean variable. In case the variable is true, the step will not be executed. This option is very useful to execute steps based on parameters. |
| Reasoning | You can activate enhanced reasoning for this step. If you activate this option an additional image based provider will validate the element identified by the DOM based agent, and provide additional feedback / retry in case it thinks the selected field was incorrect. This slows down the test progress but can help to reduce hallucinations for complex steps. |
| AI Model for step execution | Defines one of the defined AI models in the tenant to be used in the execution of the step. This will overwrite the defaults of the tenant settings. This setting is especially helpful, if you normally want to use a low cost model but for one specific step you need a high cost model. |
| Files (Upload/Download) | Files which are assigned to the step. Required if you want to prompt about file uploads or downloads in the step. See prompting for more details. |
| Scripts | Java-Script functions which can be used inside the test case definition. See section Scripting for more information. |
| Force additional wait times before/after step | Force additional wait times before or after the step (in ms). This can be useful if you have a step which needs more time to be executed. Note: Normally auto-waiting is good enough. Use this option with care, as it prolongs test execution. |
| XPath this step is about | Explictly define the XPath for the step. This is useful if the AI agent does not find the correct element. Note: You are loosing the flexibility of msg.ZenTestAI in case you define the XPath. Use with care. |
| XPath of the parent element | Explictly define a section xpath the step is relevant for. This is useful if you have a very static section where the AI agent should search for the element. This will decrease runtime, as the AI agent can focus on a smaller area. Note: You are loosing the flexibility of msg.ZenTestAI in case you define the XPath. Use with care. |
| Additional Instructions for AI | Additional instructions for the AI agent. This can be used to give the AI agent more context about the step. |
When applying advanced settings it is best to have a one to one relation between your step in natural language and the step to be executed. Example: You define a XPath the step should use. The step is defined as: "Click button A and than click Button B". In this case the xpath will be used for both buttons, which might not be the desired behavior.