Scripting
In Scripts-Section you can create scripts which are executed before/during/after test case execution.
Implementing scripts is an expert feature and should only be used by experienced users. Scripting causes the risk of additional maintenance effort and can lead to flaky test results.
Scripts are generally executed inside the context of a running test in the browser window. You therefore have all access which the currently logged in user in the test automation has. You have access to the whole window object and can manipulate the DOM, execute JavaScript and interact with the browser.
You do not have access to msg.ZenTestAI itself. You are therefore not able to manipulate steps, test-cases or execution plans. Scripts are executed in the sandboxed browser environment
Main use cases for scripts are:
- You want to call REST APIs before / after tests for setup / cleanup (i.E. data preparation)
- You want to check some technical conditions
- You want to execute one specific use case which is not supported by msg.ZenTestAI (i.E. click at pixel positions, ...)
- You want to manipulate the DOM or javascript objects in the browser
Scripts should be developed once and referenced in the test-cases. Do not use scripts for test-case specific logic. In case you have to fully script a test case it is recommended to develop this test case in a traditional test automation framework.
Create / Edit scripts
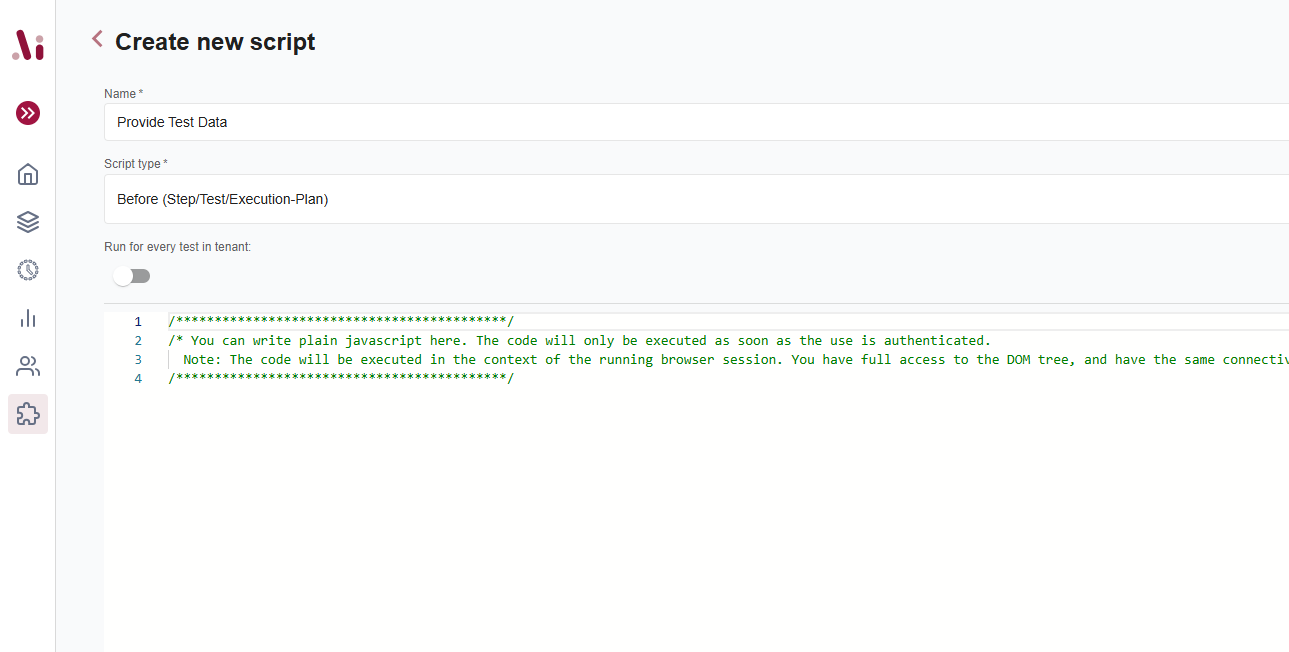
When creating a new script you can specify:
- Name: A unique name of the script. You are using this name for referencing the script in the test-case.
- Script-Type: When is the script executed? See details below.
- Run on every test in tenant: When activated, the scripts don't have to be referenced anymore, but will be executed automatically before / after every test case in the tenant.
- Script: The actual script
A Usage References button in the script editor lists every test that currently references the script — useful before renaming or deleting it.
The following Script-Types are available:
- Before: The script is executed before a test-element (Step, Test-Case or Execution Plan)
- After: The script is executed after a test-element (Step, Test-Case or Execution Plan)
- Instead: The script is executed instead of the test-step (you have to select the script inside the test step details in this case)
- After All (Execution Plan): The script is executed once after ALL test cases in an execution plan have completed. See Teardown Scripts for details.
Use Scripts
You can use scripts in the test-cases, test-case-steps and execution plans. For test-cases and execution plans you can use the script types before and after. Scripts for test-cases will only be executed after successful logon. There is no possibility to execute scripts before or during the login.
For steps you can reference the to be executed scripts in the test step details menu. You do not have to mention the script in the test-step description. The script will be detected and executed automatically.
You can reference multiple scripts in a test-case or test-step. The scripts are executed in the order of the reference.
Script-Rules and Debugging
The following rules apply when writing a script:
- You have to write standard typescript accessing only the provided API and browser functions
- You have full auto complete support with intellij
- You have access to parts of msg.ZenTestAI AI APIs and all browser APIs.
- Your code is called in the context of an asynchronous function. You can therefore use async / await for asynchronous operations. The script will finish and the test continues after the script has finished (including async operations).
- There is a timeout of 300 seconds. If the script did not finish in this time, the test will be marked as failed.
- You can use the provided
apiobject to access AI functionalities inside your code. - There is no debugging functionality, but you can use api.log to log messages. All logs written by your code will be visible in the test-execution protocol.
- Any uncaught exception / error will lead to a failed test execution.
The start code will always look like this:
handle = async (api: ZenTestAPI) => {
  // Your script logic here
};
api object is provided for you — never declare itThe runner always injects api for you. Never declare or reassign it — in
particular do not write const api = window._zenTestAiPlaywright;. That
window._zenTestAiPlaywright object is the same api, so re-declaring it
throws a SyntaxError: Identifier 'api' has already been declared and the whole
script fails.
When the AI assistant adds a deterministic script step (via the runner's
interactive script fallback), write plain JavaScript — no TypeScript type
annotations — and note that api is already in scope: you can call
await api.…() directly at the top level (and return to stop early) instead
of wrapping the body in your own handle function.
All your code should be placed inside the handle function. As visible, you can fully access the API object which provides you with the following functionalities:
- click and type elements by HTMLElement or by text (in case of text based access, the element will be searched by AI)
- run steps (via text)
- assertions based on text
- get data from the current screen based on AI functionality.
- get and set parameters
- read and modify files the test has downloaded (see Working with downloaded files)
- set geolocations
- log and fail
Example code:
handle = async (api: ZenTestAPI) => {
    const allMenuItems = await api.extractData("Comma seperated list of all menu items in the top right");

    const allPlants = allMenuItems.value.split(",");
    for ( let i=0;i< allPlants.length;i++) {
        await api.click(`Menu Item ${ allPlants[i] }`);
        await api.assert(`Expect to see the at least part of the menu item title ${ allPlants[i] } in the page title`);
        await api.click(`CLick the back button next to the title ${ allPlants[i] }`);
    }
};
Currently there is no write back to the test execution itself. You can therefore not influence the test execution using scripts. In case you have interesting use cases for this, please don't hesitate to contact us via hello@zentest.ai
API reference
All api methods are async — always await them. This table is generated from the runner's script API (ZenTestPlaywrightApi); if the runner adds or changes a method, update this table too.
| Method | Returns | Purpose |
|---|---|---|
api.getUrl() | string | The current page URL. |
api.getParameterValue(name) | string | Read a test parameter value by name. |
api.setParameterValue(name, value) | boolean | Set a test parameter value. |
api.log(message) | boolean | Write a message to the execution protocol. |
api.fail(reason) | boolean | Immediately fail the test with the given reason. |
api.click(element, options?) | boolean | Click a DOM Element. |
api.type(elementOrText, value, options?) | boolean | Type into an Element, or into a field described in natural language (found by AI). |
api.findElement(search, options?) | { element, found } | Find a DOM element from a natural-language description. |
api.assert(whatToExpect) | ResultAssertion | AI assertion — fails the test if it does not hold. |
api.check(whatToExpect) | ResultAssertion | AI assertion — continues even if it does not hold. |
api.extractData(whatToGrab, options?) | ParameterExtractResponse | Extract data from the current page by natural-language description. |
api.run(text, options?) | boolean | Run a natural-language sub-step (delegates back to the AI). |
api.getDownloadedFile(fileName?) | Uint8Array | Bytes of a file downloaded during the run (see Working with downloaded files). |
api.patchDownloadedFile(content, fileName?) | boolean | Overwrite a downloaded file (Uint8Array or string). |
api.setGeolocation(latitude, longitude) | boolean | Override the browser geolocation. |
api.getSecret(name) | string | null | Read a tenant-level secret by name (see Using tenant secrets). null if no such secret exists. |
Beyond api, a script has full access to the browser — the entire window object, the DOM (document, …) and all standard Web / JavaScript APIs (fetch, Date, Math, JSON, Intl, …).
Using tenant secrets
Credentials that several scripts need — an external system's API key, a service account token — are maintained once per tenant instead of being pasted into each script. A tenant admin creates them under Tenant settings → Secrets as name/value pairs; the value is stored encrypted and is never displayed again.
A script reads a secret by name:
handle = async (api) => {
  const apiKey = await api.getSecret('EXTERNAL_API_KEY');
  if (!apiKey) {
    await api.fail('The secret EXTERNAL_API_KEY is not configured for this tenant.');
    return;
  }

  const response = await fetch('https://example.com/api/orders', {
    headers: { Authorization: `Bearer ${apiKey}` },
  });
  await api.setParameterValue('orderCount', String((await response.json()).length));
};
Macros can read secrets the same way. A macro receives api as an argument, so declare it as a parameter of the macro function and make the macro async:
async function authHeader() {
  return 'Bearer ' + (await api.getSecret('EXTERNAL_API_KEY'));
}
Two rules matter:
- Never log or assert on a secret.
api.log(secret)writes it into the execution protocol in plain text, and assertion messages end up there too. api.getSecret()only works inside a running script or macro. Any other JavaScript on the page is refused, so a tested application cannot read your tenant's secrets.
Working with downloaded files
When a step has triggered a download, a script can read that file's contents and even change them before a later step consumes it. This is the mechanism behind capturing a download into a file parameter and re-uploading it in a following step.
Two API methods are available:
getDownloadedFile(fileName?)— returns the bytes of a file the current execution has downloaded, as aUint8Array. OmitfileNameto get the most recent download; pass a name when the step produced several files.patchDownloadedFile(content, fileName?)— replaces the contents of a downloaded file withcontent(aUint8Arrayor astring). A later step that re-uploads the file then sees the modified version.
handle = async (api: ZenTestAPI) => {
  // Read the file the previous step downloaded
  const bytes = await api.getDownloadedFile();
  const text = new TextDecoder().decode(bytes);
  await api.log(`Downloaded file is ${bytes.length} bytes long`);

  // Modify it before a later step re-uploads it
  await api.patchDownloadedFile(text.replace("DRAFT", "FINAL"));
};
These methods operate on files downloaded during the current execution. To carry a downloaded file beyond the test, remember it into a parameter — see Capturing a downloaded file.
Teardown Scripts
Teardown scripts (Script-Type: After All (Execution Plan)) are special scripts that execute once after all test cases in an execution plan have completed, regardless of whether individual tests passed or failed.
Use Cases
- Cleanup operations: Reset test data, delete temporary files, or restore system state
- Final verification: Check overall system state after all tests have run
- Reporting: Generate summary reports or send notifications
- Data aggregation: Collect and process data from all test executions
How to Use Teardown Scripts
- Create the script: In the Scripts section, create a new script with Script-Type After All (Execution Plan)
- Assign to execution plan: In the execution plan configuration (both SIMPLE and EXTENDED), select your teardown script from the Teardown Script dropdown
Unlike Before/After scripts, teardown scripts cannot be assigned to individual test cases or steps. They can only be assigned to execution plans.
Execution Behavior
- The teardown script runs after all test cases have completed
- It runs regardless of test results - even if all tests fail, the teardown still executes
- The teardown uses the same agent and base URL as the first test in the execution plan (for authentication)
- All remembered parameter values from executed tests are available in the teardown script
Accessing Parameters
The teardown script has access to all parameters that were "remembered" during test execution. Use the API to access these values:
handle = async (api: ZenTestAPI) => {
  // Get a parameter that was remembered during test execution
  const orderId = await api.getParameterValue("orderId");

  // Use it for cleanup
  await api.log(`Cleaning up order: ${orderId}`);

  // Call cleanup API. `fetch` uses the same base URL as the test execution.
  const response = await fetch(`/api/orders/${orderId}`, { method: 'DELETE' });

  if (!response.ok) {
    await api.fail("Failed to cleanup order");
  }
};
Execution History
When you remove a teardown script from an execution plan, the historical execution records are preserved. You can still view past teardown executions in the execution history, even after the teardown script has been removed or changed.
If you re-add the same teardown script to an execution plan after removing it, a new teardown test will be created. The old execution history remains separate and linked to the previous teardown test.