Test-Case Overview
Overview
The test-case overview gives you a single view of every test case (and snippet) defined in your tenant, grouped into folders. From here you create, organize, run, import and export tests.
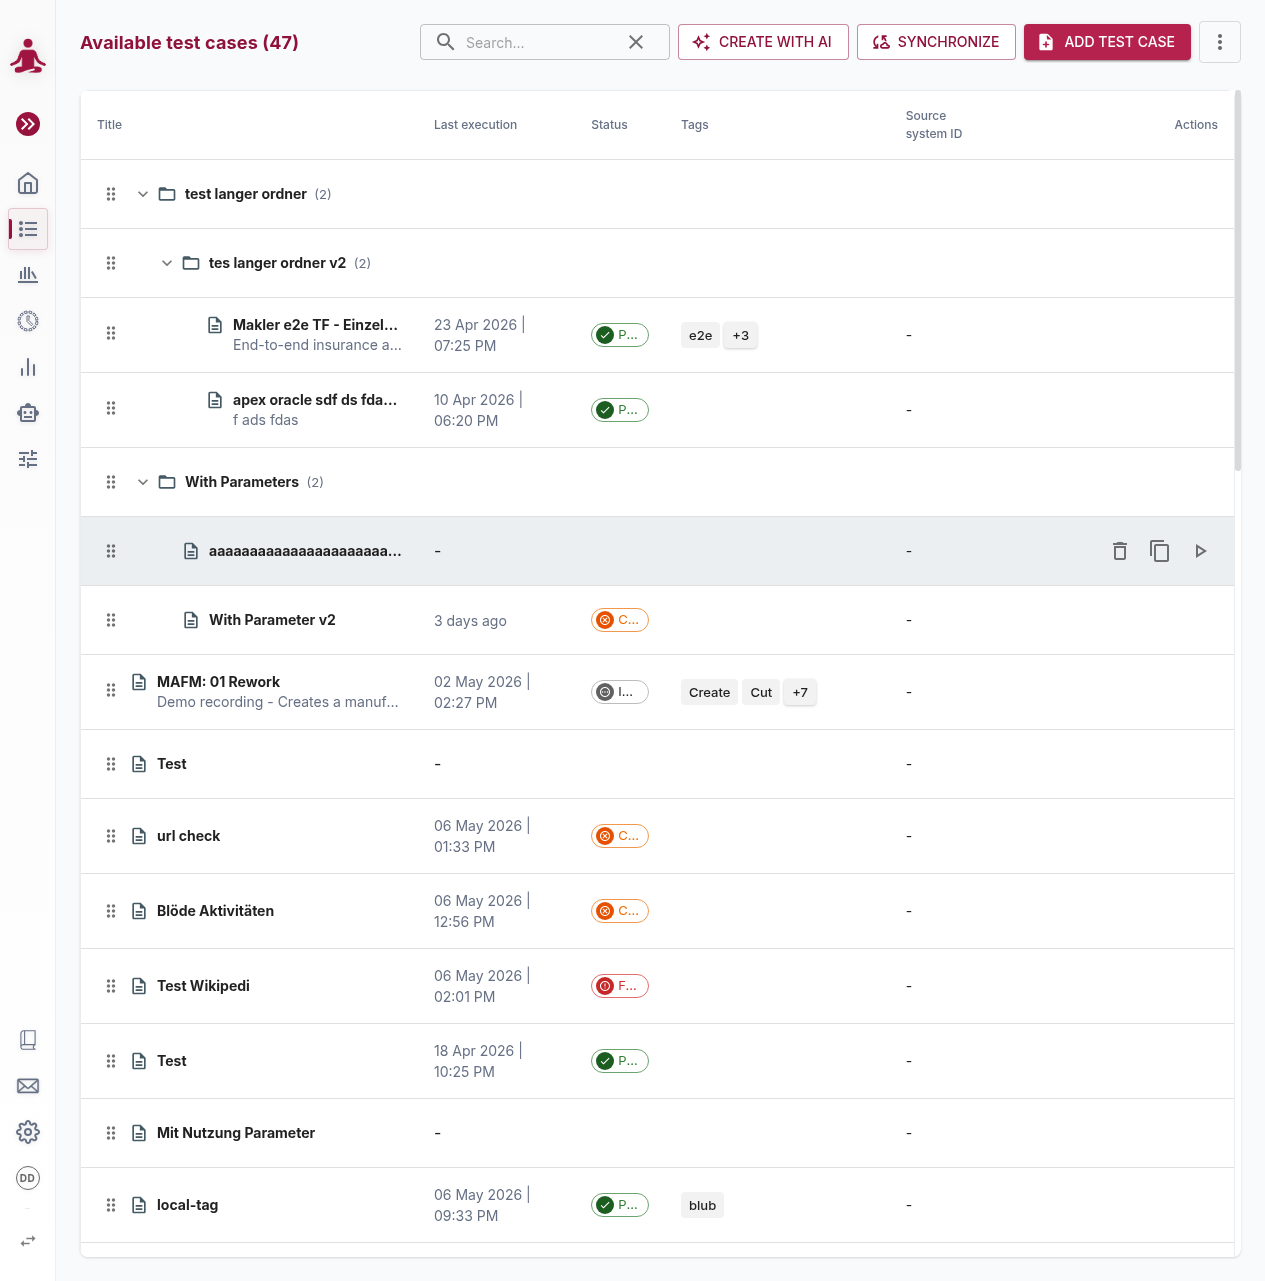
The header shows the number of test cases currently visible — this count reflects your search filter, not the total.
Columns
The list contains the following columns:
- Title — the test case title and (where set) a one-line description.
- Last Execution — the date and time of the most recent execution, or
-if the test has never been run. - Status — the outcome of the last execution: Passed, Failed, Cancelled or Initial (for tests that have never been executed).
- Tags — the tags attached to the test, with an overflow badge (e.g.
+3) when there is not enough space to show all of them. - Application — the application the test's start URL belongs to.
- Source system ID — the identifier of the test in an external system (e.g. Jira XRay). This column only appears when at least one test in the list was imported from an external system.
- Actions — see Row actions below.
The column headers offer tri-state sorting (ascending → descending → off) and filter funnels for narrowing the list per column. See List sorting and filtering for how these controls work across all list pages.
Snippets (reusable building blocks referenced from inside test cases) live on their own page, reachable via Snippets in the left navigation. The Snippets page looks similar to this one but only shows Title, Tags and Actions, since snippets are never executed directly.
Folders
Tests and snippets are organized into a tree of folders. Click the arrow next to a folder to expand or collapse it. A folder shows the number of direct children in parentheses next to its name.
The folder UX — drag-and-drop, nesting, "drop to root" and locked folders — works the same way as on the other list pages in msg.ZenTestAI. See Folders in the Concepts section for the full reference.
Folder actions
Hover over a folder row to reveal its action buttons (left to right):
- Delete — remove the folder. Any contents are removed with it, so use with care.
- Add subfolder — create a new folder underneath this one. The parent is preselected.
- Add test — create a new test case directly inside this folder.
- Edit — change the folder's name and properties.
- Play — execute every test contained in the folder.
Row actions
Hover over a test row to reveal its action buttons (left to right):
- Delete — permanently delete the test.
- Copy — open the creation form pre-filled with this test's content. You can adjust the copy before saving it as a new test.
- Synchronize — only shown for tests that were imported from an external system and are still bound to it. Pulls the latest title and steps from the source system, overwriting your local copy.
- Play — start the test and open its execution view.
To open a test for editing, click anywhere on its title row.
Drag and drop
Each row has a drag handle on the left. You can:
- Reorder tests and folders within the same parent folder.
- Move a test into a different folder.
- Move a folder under a different parent.
- Move an item back to the root level by dropping it onto the "drop to root" zone that appears at the bottom of the list during a drag.
Manual reordering is only available while the list is in its default order: as soon as a column sort or a column filter is active, the drag handles are disabled. Clear the sort and filters to reorder rows again.
Menubar
The menubar above the list contains, from left to right:
- Search — filters the visible tests by title, description, tags, source-system ID and URL. The count in the page header updates as you type.
- Create with AI — opens an interactive AI assistant that helps you build a test case from scratch by chatting with you. See Create with AI below.
- Add test case — opens the creation form for a new test. Keyboard shortcut: Ctrl+m.
- More actions (⋮) — a menu containing:
- Synchronize — pull the latest version of every imported test from its source system. Only available when at least one test in the list was imported.
- Import — opens a sub-menu with the available import options (see Importing tests).
- Export — opens a sub-menu to export all tests in this tenant as JSON or Text.
- Add Folder — create a new empty folder at the root level.
Which entries are visible in the menu depends on your permissions and on which external systems are configured for the tenant.
Create with AI
The Create with AI button opens an assistant dialog that helps you generate a test case (or a set of related test cases) through a guided conversation.
You provide:
- The URL of the application you want to test.
- A short description of what the test should cover.
- Optionally, the agent (browser/user role) the test should run as.
- A choice between creating a single test or a set of related tests in one go.
After confirming, a chat panel opens on the side and the assistant takes over: it explores the application, asks clarifying questions when needed, and builds the test step by step in front of you. You can answer back at any time to steer it — refining the goal, correcting an assumption, or adding constraints — and you can see the test taking shape live.
When the assistant is done, the resulting test (or tests) appear in the list, ready to be reviewed and executed like any other test.
Use this feature when you want to create tests quickly without writing each step yourself, or when you are exploring a new application and want guidance from the assistant on what is worth testing.
The Create with AI button is only visible to users with edit rights on the tenant and requires an AI chat-model to be configured by your administrator (see AI-Models).
Importing tests
The Import entry in the More actions menu opens a sub-menu with the import options available for your tenant:
- Import via AI — paste a description of your test cases or upload a document (e.g. a Word file, screenshot or specification), and let the AI translate it into draft test cases for you. You are taken to a review screen where you can edit each generated test, deselect the ones you do not want, optionally give the AI further instructions to refine the result, and finally confirm to save all selected tests to your tenant. Use this when you already have written test scenarios — for example in a specification document or a list of test ideas — and want to turn them into runnable tests in one step.
- Import from Jira XRay / Import from Jira Zephyr — import test cases from your configured external test management system. For more information see External Systems.
The Import sub-menu only shows the options that apply to your tenant; if no external systems are configured and you have no edit rights, the Import entry may not be visible at all.
Exporting tests
The Export entry in the More actions menu lets you download all tests of the current tenant as either:
- JSON — a machine-readable export, useful for backup or for moving tests between tenants.
- Text — a human-readable text export of the test cases.
Keyboard shortcuts
| Hotkey | Description |
|---|---|
| Ctrl+m | Add a new test |
See Hotkeys for the full list of keyboard shortcuts across the application.